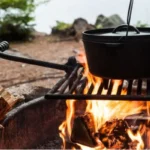
If you’re an outdoor enthusiast, you know that grilling is integral to any camping trip or backyard barbecue. But lugging around a big, bulky grill can be difficult and inconvenient. That’s why it pays to invest in a portable grill—a lightweight, collapsible version of the traditional grill perfect for tailgating, camping trips, and other outdoor adventures. Let’s look at how to build a portable grill.
To build a portable grill, you’ll need a metal grate, bricks or blocks for the base, and a metal sheet as a cooking surface. Assemble it securely, ensuring good airflow for the fire underneath. Customize as needed for your outdoor cooking needs.
Are Portable Grills Worth It?
Portable grills offer the convenience of taking a high-quality grilling experience on the go. Whether planning an impromptu picnic, a family camping trip, or needing your grill handy for tailgating at the big game, having a portable grill at your disposal can simplify this otherwise daunting task.
Their ability to heat up quickly allows you to enjoy hot and tasty grilled meals rapidly, and handy features such as temperature control knobs and weatherproof covers help ensure that every meal cooks perfectly.
Although portable grills may require more upkeep than their stationary counterparts, considering the long-term benefit of portability for all outdoor cooking needs makes them worth it.
Also Read: How To Use Expert Grill Thermometer?
How To Build A Portable Grill | Step By Step Procedure

Step 1: Gather Your Materials
The first step in building your portable grill is gathering all the necessary materials. This includes a 12-inch chrome-plated cooking grate (which can usually be purchased at any hardware store),
Two large metal washers; one piece of 1/2-inch steel pipe
One piece of 3/4-inch steel pipe; one piece of aluminum tubing (1/2 inch diameter)
Two pieces of aluminum sheeting (3/16 inch thick); six 1-inch screws
Four 2-inch screws
Four 3/8-inch nuts and bolts
Two 1/-14 nuts and bolts.
You may also need basic tools such as a drill, hammer, pliers, saw, and screwdriver.
Step 2: Assemble the Frame
Once you have all your materials ready, it’s time to start assembling the frame for your portable grill. Start by cutting the 3/4 inch steel pipe into four equal lengths (each about 10 inches long).
Then cut the 1/2 inch steel pipe into two equal lengths (about 10 inches long). Take one section from each size pipe, drill four holes into them with a drill bit slightly larger than the size of your bolts, then bolt them together using two 3/8 inch nuts and bolts through each hole. This is now the main frame for your portable grill.
Step 3: Attach the Grate and Legs
Next, attach the legs by drilling two holes into each leg section with a drill bit slightly larger than the size of your screws and connecting them to either side of the frame with 2-inch screws.
Finally, attach the cooking grate by placing two large metal washers on either side before bolting it onto the top section of the frame using 1/4-inch nuts and bolts. Ensure all nuts and bolts are tightly secured so that when you pick up your portable grill, it will stay in place!
Also read: Can I Adjust The Thermometer On A Gas Grill?
What Can You Make On A Portable Grill?
A portable grill is a great way to enjoy outdoor cooking, whether hosting a backyard barbecue or camping along an open road. Almost anything can be cooked on a portable grill with the right ingredients and a little teamwork!
Burgers are one of the most popular dishes to prepare on a portable grill. Not only do burgers cook quickly, but you can also keep them simple with ground beef and salt & pepper; or dress them up with delicious toppings like bacon, cheese, and caramelized onions. You could even choose something different, like turkey or veggie patties, instead of traditional beef-style burgers.
Almost any meat fares well on the grill, too – pork chops, steaks, and even lamb chops are great grilling options! Season your cuts generously before searing them over hot coals for perfectly charred edges every time. Or get creative by wrapping vegetables (like potatoes or asparagus) in foil packets with herbs and spices for extra flavor alongside your meats at dinner time.
If you’re looking for something lighter than grilled proteins & sides, then kebabs are always an excellent option! Skewer cubes of chicken breast, shrimp, or halloumi cheese onto bamboo sticks; cook those skewers over hot flames until they’ve achieved that perfect charring effect; then serve it up alongside freshly made dips like tzatziki sauce and hummus – yum!
Remember to have fun with it no matter what type of food you decide to make on your portable grill! Try out new recipes when possible and experiment with unique ingredient combinations.
After all, there’s no better way to enjoy good food outdoors than by taking advantage of everything nature has provided through good old fashion grilling techniques. Bon Appétit!!
Also read: What Portable Grill Can Be Direct Hock Up To RV?
Bottom Line:
Now you know how to build a portable grill. Building a portable grill doesn’t have to be daunting – with just some basic tools and materials, you can easily construct your lightweight yet sturdy outdoor cooking companion, perfect for camping trips or backyard barbecues!
With this guide as a starting point, you’ll be ready to hit the open road with your delicious new addition! So what are you waiting for? Get building today!