Taking your RV on an extended camping trip is a fantastic way to explore the great outdoors. But it also comes with its own unique set of maintenance tasks. Unfortunately, one of those tasks is draining the camper toilet. Draining your camper toilet may seem daunting, but it’s pretty simple. Let’s look at how to drain a camper toilet safely and effectively.
How To Drain A Camper Toilet?
Step 1: Prepare the Toilet for Draining
Before you begin draining your RV toilet, it’s essential to prepare the plumbing system for what you are about to do. Start by turning off the water supply valve underneath the toilet and then turn off all water sources inside the bathroom.
Next, flush the toilet until there is no more water left in the bowl or tank. You can then detach any hoses connected to the toilet and place them aside. So they don’t get in your way while you work.
Step 2: Empty The Tank
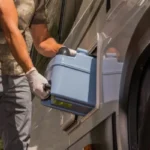
Once you’ve prepared your camper toilet for draining, it’s time to start emptying the black water tank. First, ensure that all valves near or on top of the tank are open. This will allow airflow into and out of the tank as you empty it.
Next, remove any caps on top of your tank and attach a hose to one of them (you may need an adapter for this). Place one end of this hose into a disposal container or directly into a sewer connection. Then, proceed to open up any remaining valves that may be present on top of your tank.
At this point, you should start seeing black water from both ends of your hose – stand back so you don’t get splashed! Once all the water has been drained from your RV tank, close up all valves and disconnect your hose(s).
Step 3: Clean The Tank & Hose
Your black water tank should now be wholly drained. But before you put everything away, make sure that you clean both your tank and hose with some warm soap and water (or whatever cleaner is recommended by the manufacturer). This will help keep bacteria from growing inside either one after use. After cleaning everything up correctly, dispose of any waste appropriately (i.e., septic tanks, etc.)
Read More: How To Remove Camper Toilet | 3 Easiest Steps
Where To Drain A Portable Toilet Waste Tank?
When your portable toilet has reached capacity and needs to be emptied, you have two options: Either empty it yourself or hire a professional waste removal service. If you choose to do it yourself, make sure that you use an appropriate disposal container.
If possible, find a tank that meets local regulations and has an official seal of approval from the Environmental Protection Agency (EPA). The most common type of tank is made from high-density polyethylene plastic, which is designed to contain both liquid and solid waste safely and securely.
Hiring A Professional Service To Drain A Camper Toilet
If emptying the tank yourself isn’t an option, then hiring a professional service might be your only choice. A professional waste removal service will come equipped with all the necessary tools and equipment to empty your tank and transport it for proper disposal safely. They will also take care of other necessary tasks, such as cleaning out the inside of the tank and refilling it with clean water for further use.
Safety Precautions When Draining Portable Toilets
No matter which route you decide—DIY or professional service—it’s essential that you take all necessary safety precautions while emptying your portable toilet waste tank. Be sure to wear protective gloves, clothing, and eyewear while dealing with raw sewage. As it can contain harmful bacteria that can cause severe illnesses if ingested or otherwise exposed to your skin.
Also, ensure that any area that comes into contact with raw sewage is well-ventilated before attempting any work. Finally, always safely dispose of used gloves after use so as not to contaminate other surfaces in the area.
Read More: How Do Camper Toilets Work?
Conclusion
We hope now you know how to drain a camper toilet. With these steps in mind, anyone can quickly drain camper toilets when necessary. Once complete, reconnect all hoses/valves securely before flushing again, as this will prevent unwanted leaks or spills inside your RV. While this procedure may seem daunting at first, once done correctly, it does not have to take much time – happy camping!