Many people ask the question, how to test a solar powered fence charger? Well, to test a solar-powered fence charger, Turn off the fence and disconnect it from the battery. Set your multimeter to DC voltage mode. Connect the multimeter’s red lead to the charger’s positive terminal and the black one lead to the negative terminal.
The multimeter will display the charger’s output voltage. Ensure it matches the expected voltage range for your fence charger.
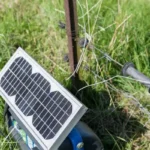
How An Solar Powered Fence Works
A solar-powered fence is a genius idea that uses the sun’s energy to power it up. It all starts with those panels soaking in the sunlight, turning into electricity. Smart, right? Now, that electricity is stored in batteries so that you’re good to go even on cloudy days.

The fence has an “energizer” that gets its energy from those batteries. This energizer sends little electric pulses through the fence wires now and then.
So, when an adventurous animal explores the fence and touches the charged wire, guess what? They get a harmless but effective electric shock that sends them running away.
Read more about Does a Solar Powered Fence Charger Have an AC Current?
How To Use A Multimeter To Test An Solar Powered Fence
You should know the answer to “how to test a solar powered fence charger?” Before we dive in, let’s talk about safety. You don’t want a shocking experience, so turn off the fence first. Disconnect the energizer from the batteries and any power source to keep things safe.
Set Up Your Multimeter
Grab your trusty multimeter and switch it to the DC (Direct Current) voltage mode. We’ll use this mode to measure the fence’s electrical stuff. Choose a voltage range covering the fence’s expected voltage. It is usually between 5,000 and 10,000 volts.
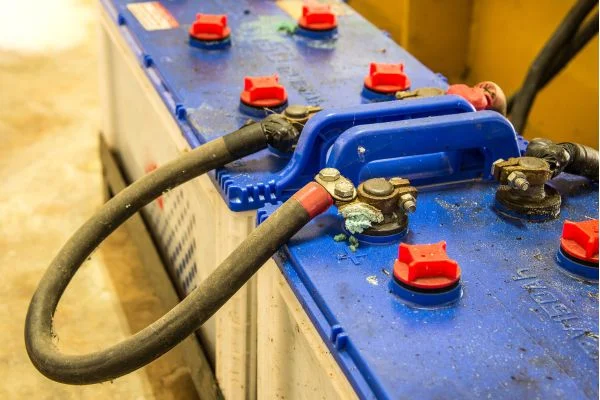
Check the Battery
First up, we’ll check the battery that fuels the fence. Attach the multimeter’s red (positive) to the battery’s positive terminal. And the black one (negative) to the negative terminal.
Keep an eye on the voltage reading – a fully charged battery should show close to its rated voltage. If it’s way off, consider charging or replacing the battery.
Peek at the Solar Panel Output
Now, let’s see how well that solar panel performs. Find the wires connected to the solar panel on the energizer unit. Usually, you’ll spot a red wire (positive) and a black wire (negative).
Connect the multimeter’s red lead to the red wire and the black lead to the black wire. Watch the voltage reading on the multimeter – it should show the solar panel’s output voltage. Make sure it matches what you expected.
Time to Check the Fence Voltage
With the energizer reconnected to the battery and switched on, measure the voltage. Find a part of the fence that’s not grounded or short-circuited.
Place the multimeter’s red lead on one wire and the black one on another. Ta-da! The multimeter will reveal the voltage on the fence.
Read more about How To Make A Solar Powered Street Light?
Fence Voltage Troubleshooting
Is the fence voltage reading too low? Don’t worry; we’ve got some troubleshooting ideas for you!
Check the Battery – Again!
Is the battery voltage still low? If it is, focus on recharging or replacing the battery. It’s like giving your fence a fresh power boost!
Solar Panel Woes
Let’s shed some light on the issue if the solar panel’s output reading is way lower than expected. Ensure the solar panel gets enough sunlight, and clean it well from any dirt or debris.
Double-Check Connections

Loose connections are sneaky culprits. Inspect all the wires from the solar panel to the unit, including the battery connections. Make sure everything is tight and secure.
If all seems fine, but the fence still acts up, the energizer unit might be the culprit. Check its user manual or contact the manufacturer for tips or possible repairs.
Fence Voltage Too High – High Voltage Alert!
Is the fence voltage reading off the charts? Time to find out why!
Check the Energizer Settings
Some energizer models let you adjust the output voltage. If it’s too high, dial it down to the right level. No more high-voltage surprises!
Insulator Inspection
Take a look at those insulators. If they’re damaged or wet, they might be causing voltage leaks. Replace any funky ones and keep that voltage in check.
Vegetation Trouble
Are your fence wires getting cozy with some overgrown plants? Trim away those clingy vines and branches, so your voltage stays where it should be.
More Than Voltage
Let’s take it up a notch and measure the current flowing through the fence. It’s like checking the fence’s pulse!
Current Measurement
Turn off the energizer and disconnect the fence wires from it. Safety is still our priority, folks!
Get Connected
Connect the multimeter in series with the fence. It’s like inserting it into the fence circuit. One lead goes into one part, and the other goes into the other.
Switch the energizer back on. The multimeter will now display the current flowing through the fence. Remember not to touch the fence while it’s live!
Fence Resistance
One last thing! Fence resistance can tell you a lot about its overall condition.
Disconnect and Measure
Turn off the energizer, disconnect the fence wires, and set the multimeter to the (ohms) mode. Place the multimeter across the disconnected fence wires.
What’s the Score?
Check the multimeter’s reading – it’s the fence’s resistance value. Lower resistance usually means a stronger fence performance.
By following these steps, you can confidently test your solar-powered fence like a pro! Keep your critters safe and sound while enjoying the power of the sun.
Remember, if you encounter persistent issues, don’t hesitate to refer to the manual or reach out to a pro for help. Happy testing!
Read more about How Long Will a Solar Powered Fence Charger Last?
Causes Of Low Voltage In Solar Powered Fences
So, your solar-powered fence is giving you some voltage blues, huh? Don’t worry; we’ll get to the bottom of it! Here are the most common reasons why your fence might not deliver that shocking power it’s known for.
1. Battery Situation – It’s Drained!
Alright, the battery can be a real party pooper. If it’s weak or running on empty, it won’t be able to pump up the voltage. Time to give it a boost or consider getting a fresh one!
2. Panels in the Shade
Hey, we get it – solar panels love soaking up the sun. But if they’re covered in dirt, they won’t be pulling their weight in generating power. Time to give those panels some much-needed TLC!
3. Sneaky Power Leaks
Loose connections or damaged wires can be real troublemakers. When the electricity escapes, your voltage takes a nosedive. We need to tighten things up and do some wire inspection!
4. Energizer – Wrong Settings!
Hey, let’s not forget about the energizer! Check if its settings are too low. It won’t scare away those nosy critters if it’s not set to deliver enough voltage. Time to amp it up!
5. Insulators
Those insulators might look like humble heroes. But, they can also mess with your fence voltage. Wet or damaged ones can cause trouble. Let’s show them some love and see if replacements are in order. Hope so – Now you know, how to test a solar powered fence charger?
Solar Powered Fence Voltage Recommendations
- These fences usually work between 5,000 to 10,000 volts.
- 5,000 to 6,000 volts should do the trick for your cows or horses.
- Now, you want to shoo away if you’ve got pesky predators or smaller critters. You might need to up the game. Try going for 7,000 to 10,000 volts. That should give ’em a good jolt to remember!
- A word of caution – we want the fence to be effective, not harmful! Be careful not to go overboard with the voltage. We want to keep everyone safe, including the handlers.
- Find that sweet spot where the voltage is high enough to do the job but not too much to cause trouble.
FAQs about how to test a solar powered fence charger
How do I know if my fence charger is working?
To check if your fence charger is operational, use a tester or voltmeter to measure the output. If it shows voltage, it’s working; otherwise, consult the guidelines or seek assistance.
How do you test a fence charger with a multimeter?
To test a fence charger with a multimeter, set it to DC voltage mode. Connect the red lead to the positive output terminal of the charger. And the black lead to the negative terminal. The multimeter should show the charger’s output voltage.
How do you test a fence battery?
Disconnect the fence charger from the power source. Use a voltmeter to measure the voltage across the battery terminals. A fully charged battery should read around 12-13 volts. If the voltage is significantly lower, it may need recharging or replacement.
Final Words
Alright, folks, we’ve covered how to test a solar-powered fence charger – easy peasy! Using that trusty multimeter, you can be sure your fence is doing its job like a champ.
Test it regularly to keep your animals safe and your fence in top-notch shape. Safety first, though! Always disconnect the fence from the battery before testing. Happy fencing, and keep those critters where they belong! We hope now you know the answer to “how to test a solar powered fence charger?”