Auto bed leveling is a valuable feature that can significantly enhance the printing experience on your 3D printer. If your printer does not come with built-in auto bed leveling, don’t worry! This article will guide you through adding auto bed leveling to your 3D printer. Following these steps of How To Add Auto Leveling Bed To 3d Printer, you can upgrade your printer’s capabilities and enjoy the benefits of effortless and precise bed calibration.
Before You Begin
Before diving into the installation process, there are a few essential considerations to keep in mind:
- Compatibility: Auto bed leveling systems can vary in hardware and firmware requirements. Ensure that your auto bed leveling kit is compatible with your specific 3D printer model.
- Research: Familiarize yourself with your printer’s specifications, firmware, and electrical connections. Review the documentation the auto bed leveling kit manufacturer provides to understand the installation requirements and instructions specific to your printer.
Read more about Do I Need Auto Bed Leveling 3d Printer?
How To Add Auto Leveling Bed To 3d Printer| The Step-By-Step Guide:
Step 1: Gather the Required Materials
To add auto bed leveling to your 3D printer, you will need the following materials:
- Auto bed leveling kit: Choose a kit that matches the specifications of your printer model. It typically includes a sensor, mounting hardware, cables, and necessary adapters.
- Screwdriver set: Ensure you have a suitable screwdriver to disassemble and reassemble your printer.
- Wiring tools: Depending on the kit, you may need wire strippers, crimping tools, or soldering equipment.
- Optional: Zip ties, adhesive mounts, or other accessories for securing cables and components.
Step 2: Prepare Your Printer

Before installing the auto bed leveling kit, it is essential to prepare your printer:
- Power off your printer and unplug it from the power source.
- Consult your printer’s manual or documentation to locate the necessary components for the installation, such as the Z-axis end stop or probe connector.
- Clear the printer’s workspace and ensure you have ample room to work comfortably.
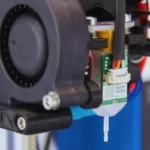
Step 3: Install the Auto Bed Leveling Sensor
The precise installation process may vary depending on your specific kit and printer model. However, the general steps involved are as follows:
- Identify the mounting location for the auto bed leveling sensor. It is usually placed near the print head, preferably on a fixed part of the printer’s frame.
- Attach the sensor bracket or mount it to the chosen location using the provided hardware. Ensure it is securely fastened.
- Connect the sensor to the appropriate wiring on your printer. Follow the instructions provided with your kit to make the necessary connections. Depending on the kit’s design, this may involve crimping wires, soldering, or using connectors.
- Route the sensor’s wiring to the control board, ensuring it does not interfere with the printer’s moving parts. Secure the wiring using zip ties or adhesive mounts to keep it organized and protected.
Read more about How Does 3d Printer Auto Bed Leveling Work?
Step 4: Firmware Configuration and Calibration
Once the hardware installation is complete, you need to configure the firmware settings for auto bed leveling:
- Determine your printer’s firmware (e.g., Marlin, Repetier, or manufacturer-specific).
- Access the firmware configuration files using the appropriate software, such as the Arduino IDE or firmware-specific tools.
- Enable the auto bed leveling feature in the firmware by uncommenting or activating the corresponding lines of code. Consult the documentation provided with your kit for any specific configuration settings or adjustments required.
- Configure the probe type and settings, such as the sensor type (inductive, capacitive, etc.), trigger height, and probe offset. These settings ensure accurate measurements and proper compensation during printing.
- Upload the modified firmware to your printer’s control board, following the instructions provided by the firmware documentation.
- Once the firmware is uploaded, perform a calibration process. This typically involves running a bed leveling routine provided by the firmware. Follow the instructions to adjust the sensor’s position and ensure accurate probing at multiple points on the bed.
- Verify the calibration by performing test prints. Make any necessary adjustments to the Z-axis offset or other parameters to fine-tune the leveling. I hope you are completely understand about how to add auto leveling bed to 3d printer
Do I Need Auto Bed Leveling?
Whether or not you need auto bed leveling for your 3D printer depends on various factors, including your experience level, the type of prints you want to create, and your tolerance for manual calibration.
Here are some considerations to help you determine if auto bed leveling is beneficial for you:
1. Print Quality
Auto bed leveling can improve print quality by ensuring a level printing surface. It helps prevent uneven layers, warping, and poor adhesion, resulting in more accurate and consistent prints. If you prioritize high-quality prints or need precise dimensional accuracy, auto bed leveling can be a valuable feature.
Read more about How Long Do 3d Prints Take?
2. Time and Effort
Manual bed leveling can be time-consuming and requires trial and error to achieve the desired level. Auto bed leveling saves you the hassle of manual adjustments, reducing setup time and effort. If you value convenience and want a more user-friendly experience, auto bed leveling can be a time-saving option.
3. Skill Level
Auto bed leveling is particularly useful for beginners or those new to 3D printing. It eliminates the need for intricate manual calibration processes, making it easier to get started with 3D printing. If you are starting or prefer a simplified setup, auto bed leveling can help you overcome the learning curve associated with manual leveling techniques.
4. Print Bed Variations
Auto bed leveling systems can accommodate various print bed surfaces, including glass, metal, or flexible build plates. If you frequently switch between different bed materials or have a non-standard build surface, auto bed leveling can adapt to these variations more effectively than manual leveling.
5. Printer Model
Some 3D printers have built-in auto bed leveling as a standard feature. If your printer already has auto bed leveling capabilities, you can use this feature without additional modifications. However, if your printer lacks auto bed leveling and you find it beneficial, adding it as an upgrade is worth considering.
Bottom Line
Adding auto bed leveling to your 3D printer can significantly enhance your printing experience, improving print quality and reducing calibration efforts. You can successfully upgrade your printer’s capabilities by following the steps of How To Add Auto Leveling Bed To 3d Printer and carefully following the instructions provided with your auto bed leveling kit. Remember to take your time, be patient, and refer to the documentation specific to your printer and equipment. With auto bed leveling, you’ll enjoy hassle-free bed calibration and achieve consistent and accurate prints.